
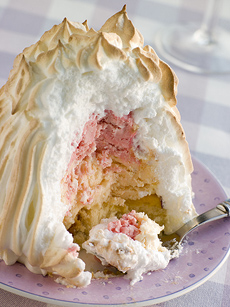
 An individual Baked Alaska with strawberry and vanilla ice cream. Photo © Monkeybusiness | Dreamstime.com. An individual Baked Alaska with strawberry and vanilla ice cream. Photo © Monkeybusiness | Dreamstime.com.
February 2010
Last Updated February 2019
|
|
Baked Alaska Recipe
A Special Occasion Ice Cream Dessert That’s Easy To Make
This is Page 2 of a two-page article. See the overview and history of Baked Alaska on Page 1.
Baked Alaska Recipe
Ingredients
- 2 quarts ice cream, softened (you can make it all one flavor, or make half the pie with one flavor and half with another—in which case, get 1 quart of each flavor)
- 1 loaf pound cake (or you can bake your own pound cake or chocolate pound cake)
- 1 cup chocolate wafer crumbs (about 17 crushed wafers), optional
- Vegetable oil, for brushing mold
- Optional garnish: raspberry or strawberry coulis (recipe below), caramel or chocolate sauce, fresh berries
Meringue Ingredients
- 1 cup egg whites (about 6 large), at room temperature (reserve the yolks for homemade mayonnaise, hollandaise sauce or other recipe)
- Pinch of cream of tartar
- 1 cup sugar
Cake Preparation
- Brush a 3-quart metal bowl with vegetable oil; line with plastic wrap. Fill the bowl with the ice cream.
- As you go, place a piece of plastic wrap on top of the ice cream and press down to close the gaps. When you’re finished filling the bowl, use the plastic wrap to cover the ice cream as you press to even out the surface.
- If you want to use the cookie crumbs in the recipe (they add more complexity and crunch), sprinkle the ice cream with wafer crumbs and cover the ice cream mass with the plastic wrap, pressing the crumbs in gently. As a next step after #4 below, you will also need to add more ice cream on top of the crumbs for the cake to adhere to, then freeze again for 30 minutes. If you don’t have the time, you can eliminate the cookie crumbs.
- Freeze until set, for 30 minutes.
- While the ice cream freezes, cut the pound cake into 1/2-inch-thick slices.
- Remove the plastic wrap from the ice cream. Completely cover the ice cream on all sides with the cake slices, trimming the “seams” as needed. Be sure the ice cream is completely insulated; then cover the ice cream cake with fresh plastic wrap and freeze until firm, at least 2 hours or up to 2 days.
- Twenty minutes before serving time, make the meringue and Preheat the oven to 500°F.
- Whip the egg whites and cream of tartar in a large bowl with a mixer on medium-high speed until foamy, about 2 minutes.
- Gradually beat in the sugar on high speed until the whites are glossy and hold stiff peaks.
-
Remove the plastic wrap from the ice cream cake, then invert the cake onto a parchment-lined baking sheet. Using a spatula, cover the ice cream completely with meringue, making the dome-shaped top slightly thicker than the sides.
-
Form whirly peaks in the meringue using the back of a spoon. Freeze for at least 3 more hours.
-
Bake the cake until the meringue peaks are golden, about 4 minutes (you can also brown the meringue with a kitchen blowtorch).
- If the cake is too hard to cut, let it soften at room temperature for 5 to 10 minutes before slicing.
- You can use a bit of raspberry or strawberry coulis, or a swath of caramel or chocolate sauce, before you plate the cake. But a Baked Alaska is exciting enough to serve plain—perhaps with a garnish of a fresh berry or two.
Coulis Recipe
Ingredients
- Package (12 ounces) frozen
raspberries, thawed
- 1/4-½ cup powdered sugar, to taste
Preparation
- Place a pint of strawberries or raspberries in a blender and purée.
- If raspberries, place purée into a fine sieve over a bowl. Using a rubber spatula, press the purée through the sieve to remove the seeds.
- Stir in the powdered sugar (you can use more or less sugar, to taste).
|
|
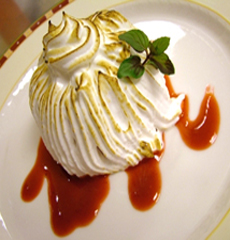
Photo by Sergey Kashkin | IST. |
© Copyright 2005-
|

